Feeds:
Posts
Comments

Posts Tagged ‘silk’

I’ve never been able to decide if my favourite colour is green or blue. If I decide on blue, I always regret sidelining the hues of fresh leaves, deep forests and oceans, jade, emerald and Connemara marble. Similarly, if I plump for green, that excludes all the shades of sky and sea, sapphire and lapis lazuli. What a good job there are endless variants of turquoise, which mixes them both! Among my stitching friends we all seem to have our go to colours for stitching and left to my own devices I will almost invariably gravitate to the green-turquoise-blue spectrum.

I really enjoy making what I call my ‘mandala’ brooches and pendants and before Easter we had a couple of sessions making some at In The Stitch Zone. I’d sold all the ones I’d already made so it was the perfect excuse to make another with a base of the most delicious piece of teal-turquoise silk dupion. I had to get both the front and back out of the silk, and it literally was just a scrap, so this is the biggest I could make it. I didn’t want to obscure the fabric too much, so the simple design was led by the five-fold symmetry of the brass cog I stitched in the middle. I added bead caps, French knots, seed beads, and unusual twisted links from a broken chain to make a dainty star and then echoed the points with a beaded picot edging featuring gorgeous iridescent peacock turquoise delicas.

I finished it off with a large odd chain link for a bail and a reclaimed vintage gold tone chain and you can find it here in my Etsy shop.

I enjoyed making this mandala pendant so much, I literally went straight into a second, this time working with an even smaller scrap of peacock-blue velvet. I bought a load of random metal detecting finds several years ago with the intention of making them into upcycled jewellery and I was running my hands through the bowl in which they live when two rings caught my eye – one old and hand forged and almost the shape of the ‘eye’ of a peacock feather and the other smaller and machine made. One offset inside another with an odd coin-shaped mother of pearl bead…

Once I’d stitched them down with a variegated thread that combined greens and turquoises with some of the patina of the metal (treated with micro-crystalline wax so it stays stable) I didn’t want to add much more: the border of roughly faceted marcasite beads was enough of a finishing touch.

Looking through the bowl of metal oddments again, I found what I think is probably a metal button with a similar patina which works perfectly as a bail.

This one hangs from a new thong with sterling silver mounts and can be found here in my Etsy shop.

I’m toying with the idea of creating kits for people to create their own Mandala brooches or pendants. As well as the usual bits: instructions, fabric, pelmet vilene, hoop, threads, needles, beads etc, I’d also include one of my ‘Magpie Packs’ to give people a selection of random odd, broken and unusual bits they can stitch into patterns. What do you think?

Read Full Post »

Last Saturday I was delighted to be asked to run a workshop for members at the Spring Meeting of Yorkshire and Humber Embroiderers’ Group (YHEG). This overarching group emerged from our active and thriving Yorkshire and Humber Embroiderers’ Guild Regional Group in the days before the Embroiderers’ Guild imploded, abandoning all its branches across the country and emptying their bank accounts on the grounds (perfectly legal but very distressing for the branches) that as a charity the monies of all branches were actually the Guild’s. In the wake of this destruction and devastation the Guild did offer £250 to each former branch who wanted to restart as an independent stitch group and many, including SEATA, to which I belong, did so.

Our EG Regional Group had always been a fantastic support and resource for all the branches and we are lucky that the people involved in the old Regional group are passionate champions of embroidery and textile art and decided to create an independent regional group (YHEG) to fill the gap. Anyone can join (for the princely sum of £10 a year) whether they belong to a Stitch Group or not. At the moment this gives access to three meetings a year. AGM in Autumn, Spring Meeting (workshops) and the Summer Gathering (speakers and trading stands) at the Regen Centre in Riccall, near York, as well as resurrecting the two-day Summer School. Costs are kept as reasonable as possible. For the Spring Meeting the cost was £15 for two x two-hour workshops, unlimited help yourself to hot drinks and a buffet lunch for members and £30 for non-members, which added to the tables each group had to sell unwanted stitchy stuff and to raise funds (heaven!) is a bargain.

I decided to offer the encrusted seascapes workshop I’d created for In The Stitch Zone back in 2022.

It works well as a workshop on a number of levels as it allows people to choose their level of stitching both in terms of variety and complexity of the stitches used and also in how much they add to the basics of a shell (or shells) and the organza strips. I only had the one sample (above) so it was an excellent excuse to stitch a couple more.

I particularly like using neutrals for this sort of encrusted work as it takes away the worries of colour choices for people who aren’t confident about using colour and it really brings the structure of the stitches to the fore. However, I also like indigo with neutrals so the second sample I stitched was on a scrap of indigo dyed sheet. I actually started it it the disastrous market I mentioned in my last post, hence the slightly washed out look of the photo under indoor spotlights.

I always start with scraps of organza and a shell. With a freeform embroidery like this, staring at the blank hooped up fabric can be as daunting as a blank page or canvas, but scattering the organza and stitching down the shell helps to break that deadlock and while you are using simple stitches to attach the shell, your creative subconscious is already working away, deciding what will be next.

Doodling with stitch, in effect. I also like to use any left over thread in my needle after I’ve stitched the frondy bits, to add to the French knot/bullion knot/bead bit at the bottom. It gives a more random feel than using a single strand and ending up with lots the same colour and also helps to build it up as you go along. I love French knots, but doing loads all in one go can be a bit tedious.

I returned to the neutrals for my third sample, stitched on lovely slubby silk noil.

And decided to try out some new stitches like the back to back rows of up and down buttonhole stitch on the left and the threaded zig zag chain in the middle.

I never refer back to the previous sample and although the basic premise of organza scraps and shell is the same and there are some stitches I use which are recurring favourites, like feather stitch, Palestrina stitch and French knots, each one is unique.

I’m adding this officially to my Workshops bar at the top of the page so if you’re interested, get in touch.

Read Full Post »

Much of my spare time this week has been eaten up by paperwork for Scunthorpe Little Theatre Club: policies, the monthly newsletter and trying to make headway with the rewrite for the 2024 panto, so what stitching I’ve done has been slow. However, after a bit of a lull, I’ve got things moving with the Brantwood wallpaper motif again. The last time I posted about it in December, I was on with the very last section, the grey border motifs.

I was on the home straight but as so often inexplicably happens, with the end in sight, I stalled. I’m very pleased with the execution of this piece but I haven’t found it the most interesting thing I’ve ever stitched. It’s quite traditional/old fashioned and I don’t find stitching over the lines of a pre-prepared image very fulfilling, especially when the stitches are so limited. But this isn’t the only piece of stitching that I’ve stopped working on with only a few hours work left and I know I’m not alone in this. I just wish I could work out why!

Anyway, I’ve got it moving again and the end is creeping closer. I’ve finished all the left hand side and have put in most of the split stitch stems on the right. I’ve also decided that I’m definitely keeping the variegated cotton outline for the central motif. I’m hoping I can keep a bit of momentum going for this now as I just want to get it finished and put into the holiday journal.

I’ve also finished the vintage scarf ring I was planning to upcycle into another barrette. At the end of panto week I’d done all the decorative stitching and it just needed a pelmet vilene stiffening layer and a felt back.

I sorted the felt and vilene layers and added a beaded blanket stitch edging to hold them together and it now looks like this:

And the back looks like this:

Yes, I did say it was going to be a barrette but I had a senior moment and finished it as a brooch, not a barrette. That’s what happens when you put things aside when you’re nearly finished instead of pushing on to completion!

Read Full Post »

Not a comment about the weather, but it easily could be at the moment! Our last prompt at In The Stitch Zone was ‘Weave’ and that gave me the excuse to create and play with a pin loom. I used a little cardboard postal box which I filled with foam padding to give me a base to push the pins into. I used crewel wool in beige and yellow to do my first experimental piece. As I set the pins 0.5cm apart, and the crewel wool is very fine, it was a bit more open than I hoped, which means you can see the knots where I was joining pre-cut pieces of wool, but other than that, I think it worked out quite well.

I wanted to try it again with some thicker tapestry wool and I actually remembered to take some in progress photos this time so you can see how the loom works, with pins not only top and bottom, but also along the sides, which keeps the spacing between the warp and weft rows. Lots of knots again because I’m using pre-cut lengths from a load I bought in a charity shop which I think were probably from a kit.

This block is 9.5cm square and I managed to find a weaving needle in my workbox which made life very much easier with this sample as it was long enough to go across the whole piece in one go.

The thicker wool was a definite improvement and the denser texture meant the ends of the knots are much more difficult to see now it’s finished. I’m also hoping that I can more easily darn the ends from the weft knots along the edges.

I’m planning to use the cream piece as a background for the first one – something like this.

I’m delighted to have finished the central section of the Brantwood wallpaper motif. Last time I had successfully played red thread chicken and was thinking about using a very dark charcoal grey for the remaining stars rather than black.

I chose a lovely deep charcoal grey by HDF called ‘Night Smoke’ and have not only completed the stars, but also stitched over the red section at the base of the stalks which should have been black/grey. The grey is not quite as dark in real life as the photo suggests, but the weather isn’t really helping with good photographs at the moment.

The last section is the light grey. I’m not planning to fill in all the grey around the leaves as in the original – I can’t see that working at all – so I’m going to stitch the outline of the shape around the central motif and then satin and split stitch the stems and leaves around the edges. However, to my amazement, after having searched through all my threads, I’ve found I don’t have any pale grey silk thread at all, but I do have this lovely subtly variegated stranded cotton which is the right tone, if a little on the grey-blue rather than the grey-brown side.

I am torn though. I like the idea of the grey having the same sort of very subtle variegation as the blue, and I am also always keen to used what I already have rather than buying new. However, I love the lustre of the silk threads I’ve used throughout and I’m concerned that the cotton will look quite dull beside them. Any thoughts?

Read Full Post »

I know that seems to apply to most of what I stitch but this weekend I’ve been finishing up a couple of particularly small projects that have been hanging around for a while.

I spent the last two days at my first Christmas market this year, back at The Collection in Lincoln. It was a little slower than the previous times I’ve had a stall, but I wasn’t surprised, given the current economic situation. However, it did give me the opportunity to continue this ribbon embroidery I started back at the last market I did in June which is destined to fit in an unusual wreath-shaped brooch setting.

I added some daisies…

…and then finished it off with a mixture of silk thread and silk ribbon leaves. Now all I have to do is carefully cut it out and set it into the brooch setting.

Next job was to stitch some lavender onto a tiny oval of pelmet vilene to go in the centre of a vintage locket. I was properly away with the fairies when I started it and instead of drawing the shape onto the vilene so I had something to hold onto, I cut it out straight away. Hence why it’s being stitched onto a random piece of shirt fabric so I can at least handle it! The lavender is lazy daisy stitch in one strand of silk thread.

Then I added stem stitch stems and straight stitch leaves in a grey-green silk. In real life it’s about the size of my thumbnail.

Lastly, an update on October’s Move It On Project and news of November’s. Not that there’s much. Covid well and truly laid me low for a while and I’ve literally only just been able to keep up to date with the really time sensitive stuff. The cover of the collaborative book has progressed to a firmer design idea in my head, thanks to everyone who offered help and suggestions. There may be nothing to show, but trust me, I am a lot further on with it than I was at the beginning of the month. Therefore I plan to continue it into November and hopefully at least get a design down on paper, if not (yet) on fabric.

Read Full Post »

As I mentioned a few weeks ago, at In The Stitch Zone we’ve been working on what I’ve called the SpringBoard Project. My idea is that we all stitch something which incorporates the prompt for the week. It can be as complex or simple, obvious or tenuous as you like and therefore, hopefully accessible by anyone at any level of ability as I’m keen to encourage new people to join. I have shared some glimpses of my responses to the prompts but as I’ve completed two of them this weekend, I thought it was time for a dedicated catch up.

Week 1: Wrap

My initial idea for this was to wrap some lengths of plastic drinking straw with some scraps of fabric and then add beads and then just see where things led me. A couple of weeks ago this was as far as I’d got.

Sue, one of the ladies in the class, gave me some threads she didn’t want which were the perfect colour and that gave me the idea of wrapping the whole bundle in and out of the straws and couching them down. It would also help keep the straw sections in place.

Once I’d got this far I realised I needed a bit more space so I moved it onto a piece of furnishing fabric and a bigger hoop before I spread out and couched down the ends of the thread bundle, adding some one-wrap French knots for texture and then wrapped more beads over the ends of the loops.

I had one straw section left, so I cut it into three, wrapped each one in the rust and turquoise thread I’d been using for the couching and stitched them down with long straight stitches.

Finally I tore a strip of cloth I rusted in the summer and wrapped it with a length of perle cotton I’d used to tie the bundle up and couched it round the outside of the silk square I’d used for the background. First one finished!

Week 2: Fold

My response for this prompt was the American smocking panel I shared a couple of weeks ago. It had a lovely reception on Instagram with several people thinking it was a pastry lattice pie crust on first glance!

Week 3: Knot

My initial thought for this one was that it was an opportunity to finally get to grips with colonial knots, which I’ve been promising myself for a while but I was also quite taken with an image I found on Pinterest of layers of knotted fabric so I knotted some strips, found a random scrap of background fabric and layered them up with lines of Palestrina stitch.

I’m less happy with this sample – mainly because it’s the closest to my comfort zone. I’ve not used a new technique or given a twist to something I already knew how to do – the seaweedy curving lines are very ‘me’. However, it meets the prompt and I don’t have to love all my samples. I’ve also decided that when I find a suitable piece of fabric to mount it on I’ll have a go at a row of colonial knots or mixed colonial and French perhaps round the edge to attach it.

Week 4: Twist

This was last week’s prompt and as I spent the session struggling with what I though was a chest infection I only got this far with the base grid for Twisted Lattice Stitch from Mary Thomas’s Dictionary of Embroidery Stitches. I’ve stitched it in mercerised cotton on linen so I could use the weave to keep things even but I suspect it’s a bit on the small side. (No surprise there…)  Mary Thomas shows it worked as a diamond so even though it looks rectangular it does have the right number of thread on each side – eventually…

The chest infection? After miraculously avoiding it for nearly three years (not bad given I’m a supply teacher, my husband works in two schools and my little one has been in school and college) I tested positive for Covid the next day. Week 5 of the Springboard project (‘Cut’) is postponed until a week on Monday!

Read Full Post »

I’ve had a few meetings over the last week which have borne fruit as far as the Victorian wallpaper motif is concerned. When I blogged about it a couple of weeks ago, I was a little worried about the coverage of the single strand red silk thread and wondering if two strands would work better.

As I’d worked a symmetrical section, I decided to change to two strands for the next one down and see how things went. And they went perfectly. The strands worked well together and I think the coverage is much smoother and neater. However, there is a definite difference in height between the two sections, so I’m wondering whether to restitch the three sections I’ve already done.

Especially as I checked back with the original photo – spot the not deliberate mistake!

I am definitely going to have to restitch the middle section, although I might just see if I can use the existing red stitches as padding, satin stitch over it in black and make it a slightly more raised block. Loving the way the silk shimmers in the sunlight.

At In The Stitch Zone, the class I teach on a Monday afternoon, we have just started the SpringBoard Project. The idea is that we all stitch something which incorporates the prompt for the week. It can be as complex or simple, obvious or tenuous as you like and therefore, hopefully accessible by anyone at any level of ability. We’re a week out of sync due to the Bank Holiday for the Queen’s funeral, so started last week with the first prompt, which was ‘Wrap’.

Even up to the start of the session I had no clear idea of what I was going to do. I had threads, fabric, beads and some other bits and pieces which included a section of plastic drinking straw. So I picked out some fabric in my favourite shades and started to play; literally doodling with the materials in front of me. And I ended up with this:

The bright turquoise is frayed habotai silk and I have caught it down with beads over sections of the straw.

I only had a small piece of the straw so I’m trying to use every scrap!

Loving this doodle and definitely going to carry on with it.

Lastly, as we’re at the end of yet another month (how did that happen?!) the round up for September’s Move It On Project. Not finished, but definitely moved on. I’ve learned some things, made choices and again, ended up with something that is worth continuing and finishing when the time is right.

I’ve bit the bullet with October’s Project because it’s actually something that has not yet been started. It’s not just my project, it’s a three way collaboration that started in lockdown and I’m painfully aware that I’m holding the job up, so I’m using this as a way of holding myself accountable. There will be pictures and a fuller confession to follow.

Read Full Post »

Finally I can show a project that has been ongoing since I was asked in February to create an unusual ribbon embroidery workshop for Lincolnshire Textiles (formerly Lincoln branch of the Embroiderers’ Guild). The remit was for something ‘richly textured’ but after some heavy googling and falling down Pinterest rabbit holes, I was fed up of looking at flowers, lovely though some of them were, and completely lacking in inspiration. It wasn’t until I was working on one of my sea themed upcycled pendants a few weeks later that a germ of an underwater idea took root.

I did some doodling with some oddments of silk ribbon just to see what was possible. French knots are definitely textured but quite greedy on ribbon. However, I liked the idea of ruching up ribbon on the surface using French knots – perhaps working them in thread rather than ribbon.

The loose twisted ribbon stitches for the tentacles of the anemone worked well from the start, although I was less pleased with the satin stitch body.

What I had taken away from this doodling was that an underwater themed piece would definitely work. The anemone was a definite, if I could create a smoother body and I wanted to use the ruched ribbon for brain coral. Doodling take two. On the right, a shorter satin stitch body. Still not right as the ribbon gathers as it goes through the fabric, leaving rough top and bottom edges. On the left, an idea for surface couching inspired by something I saw on someone’s Instagram of a section of a Jenny Adin-Christie kit. I’ve no idea how the effect was worked, but it was a wide flat thread of some type folded in a zig zag pattern and after a bit of trial and error, I managed to get the ribbon to behave and couched it down to produce the smooth edges I was looking for as well as giving an interesting textured effect.

Time to finally draw the design and use the anemone body I’d just trialled to make a prototype.

Some feather stitch and threaded chain stitch seaweed gave the design a bit of balance and added more textural interest. This was enough to give me a finalised design which I finished stitching this week.

That’s the easy bit – instructions complete with diagrams next! Good job the workshop isn’t until September…

Read Full Post »

Just finished the weekend’s Artisan Christmas Market at the Collection in Lincoln and I’m delighted to say that it was very successful, not just in terms of selling, but more importantly affirming that people are interested in both what I make and my ethos and there is definitely a market out there for unique upcycled jewellery. I had become quite demoralised with the lack of sales online and in the two galleries that stock my work and this has been a real boost.

I sold so many pairs of earrings on the Saturday that I came home and made some more to take on the Sunday, including some studs based on some vintage self-cover buttons that I unearthed in time honoured fashion while looking for something else! I had flattened out some quite flimsy bead caps and thought that two layered over each other looked like a snowflake, so while I stood behind the stall on the Saturday I stitched them onto some scraps of ultramarine blue silk dupion.

When I got home I finished off the button parts, removed the loops and added sterling silver posts and butterflies.

As I have dozens of these bead caps and another four buttons, I decided to make another pair, this time layering green chiffon from a scrap of an old sari over a piece of red silk satin.

However, the third pair is still in the planning stage and it will be different. After having made two very similar pairs, boredom set in – I really do have the attention span of a goldfish!

I decided not to add the diamantes to the mandala pendant. I laced it over a circle of felt and a circle of pelmet vilene and made a plain version of the back. At the moment I’m wondering whether to give it a beaded edge (beaded blanket stitch or a fringed edge) or leave it plain.

However, I think the prevaricating about how to finish the edging is a bit of displacement activity to mask the real issue. As you can see against my hand, it’s quite a statement piece (translation: probably a bit too big) and I’m having serious doubt about whether anyone would actually want to wear it as a pendant. I was planning to make some bag charms/key rings and I was wondering whether it would be more commercial if I did something similar with this. At the moment I could see it with a chunky tassel hanging from a bureau key or a cupboard door knob more than I could a pendant. Any thoughts?

Read Full Post »

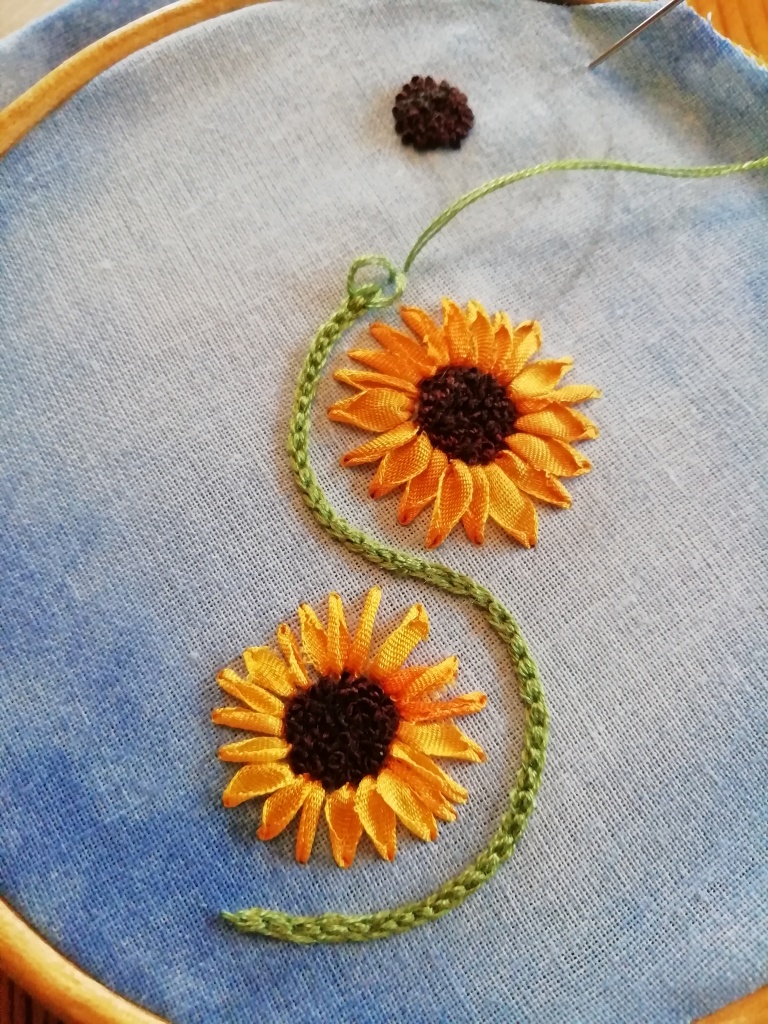
I’ve been continuing the autumn colours with some ribbon embroidery sunflowers. I love the textured deep brown centres you get from clusters of French knots. All was going pretty well until I realised I only had enough golden yellow ribbon to stitch one sunflower – possibly two if I really used every centimetre. You can see on the bottom one that I ended up using ribbon where the edges were really a bit too worn just to complete the flower.

This was then followed by the very unfamiliar feeling of going online to buy some more ribbon. I can’t remember the last time I wasn’t able to find what I wanted (or something close enough) in my somewhat extensive stash but yellow silk ribbon is something that for some reason I simply don’t have. (Any other colour, yes, but strangely not yellow.)

Unable to complete the last flower until I had the ribbon, I made a start on the next part of the design, a meandering line of Hungarian Braided Chain stitch. It’s a fabulous stitch but this is the first time I’ve worked it in anything stranded – in this case four slender strands of a very slippery pure silk so in places it was somewhat less than perfect!

The ribbon arrived a couple of days later so I was able to add the last sunflower. It’s less golden yellow than the others but I like the variation in colours and the ribbon stitch works well for the petals. No two stitches are the same, which is perfect for the slightly shaggy effect I wanted.

Satin stitch leaves over split stitch outlines.

I’m very pleased with the result, and am hoping to incorporate it into some upcycled jewellery, although the next time I do a meandering line it would probably be best to draw it out carefully first, instead of doing it by eye…

I’ve also managed to get a bit further with my beaded jellyfish. Last seen, it looked like this:

I’ve finished setting the spangles on the front and worked the first round of the opening.

It’s hidden the wobbly couched edge rather nicely which was an unexpected bonus and reminded me how much I’ve enjoyed stitching it so far, so perhaps I can make the time to push on with it now.

Read Full Post »

Older Posts »

Karen Turner Stitching Life

Pieces of a life with thread

Stitching Diaries

Level 3 Stitched Textiles Embroidery with Distant Stitch

summerholiday111

stitching, creative textiles, inspiration

hertstitch

for embroiderers and textile artists in hertfordshire and beyond

karensstitchography

Embroidery & other craft

re:retro

collecting retro

View From Our Hill

Textile, Mixed Media, Yarn, Books and Beads

Things I find in the garbage

I'm a professional scavenger making a living selling curbside garbage. This blog details my finds and sales. It also acts as an archive for things beautiful and historic that would otherwise have been destroyed.

Stitched up with Thread

Slowly threading things together through stitch

Lincs In Stitches

Creative ramblings in the Lincolnshire Wolds

Kiln Fired Art Blog

Over 60's blogger enjoying slow living, art, crafts, textiles, cooking, walking and nature

Hillview Embroidery

Teaching and Learning One Stitch at a Time

Dreaming In Stitches

a mingled yarn

sunshine and celandines

These are a few of my favourite things. 🥰

LucyAnn &Luna craft

crafting,dachshunds including other bits & bobs

Carlseapatch's Weblog

A log of progress (I hope)and fun in textile arts

seafieldview

Life on a Cornish cliff

late start studio

You don’t have to catch up, you just have to start. Tammy Garcia

Shibori Girl

....practicing the fine art of shibori

Pomegranate Studio

- because making is good for us

Fall from Grace Crafts

A blog on my craft journey highs and lows...

opusanglicanum

one Englishwoman's work

Playful Bookbinding and Paper Works

Chasing the Paper Rabbit

Chrissie Freeth - Tapestry Weaver

Blog of artist and tapestry weaver Chrissie Freeth

debbidipity

into textiles & beyond

KDD & Co

Award-winning Scottish publishing and design